
Table of Contents
- Start With a Patio Layout That Moves Guests Through the Space
- Custom Fire Pit Design Ideas That Anchor the Gathering
- Outdoor Kitchen Layout Ideas for Real Entertaining Flow
- Shade, Lighting, and Comfort That Extend Patio Season
- What Drives the Cost of Custom Patio Installation
- Accessibility, Smart Features, and Seasonal Transitions
- Maintenance and Durability ROI
- Frequently Asked Questions
Last Updated: September 10, 2026
Start With a Patio Layout That Moves Guests Through the Space
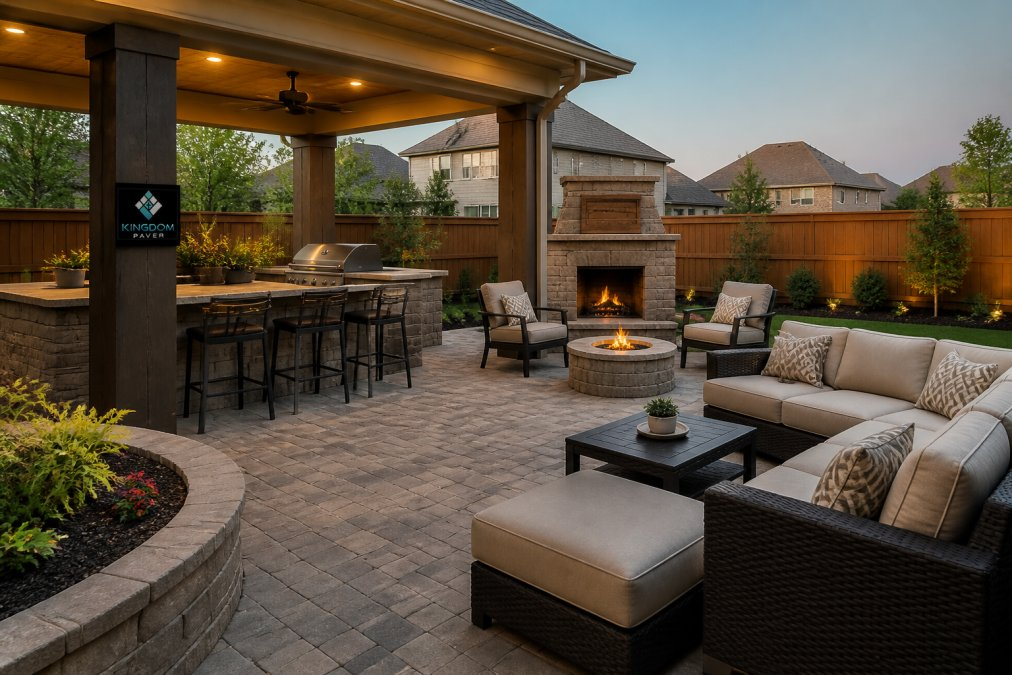
Great backyard patio design for entertaining starts with circulation, not furniture. Guests should walk from grill to dining table to lounge without squeezing past anyone, which only happens when you map the space before buying a single chair. At Kingdom Paver, we’ve spent ten years building patios in Katy and Cypress, and the best party layouts are drawn around movement first, décor second.
Zoning for Cooking, Dining, and Lounging
Think of the patio as three connected rooms: cooking zone, dining area, and lounging corner. Keep the grill within a few steps of the dining table so the cook stays part of the conversation, and push lounge seating to the quieter edge. Treating the space as one open rectangle forces guests into awkward clusters instead of flowing between zones.
Leave a minimum 36-inch walkway between zones. It’s the single change that makes a patio feel twice as large during a party.
Patio Size and Seating Arrangement Basics
For a seated dinner, plan roughly 10 to 12 square feet per guest, including chair pull-out space. Seating works best curving toward a center point rather than lining up against a wall, since face-to-face layouts keep conversation going. If the space doubles as a family hangout, choose multi-functional pieces like benches with hidden storage.

Custom Fire Pit Design Ideas That Anchor the Gathering
Custom fire pit design ideas work best when the fire feature doubles as the room’s centerpiece. A fire pit gives guests a natural place to gather after dinner and extends your patio season into the cooler months. The two main paths are built-in and portable; the right choice depends on how permanent you want the layout to be.
Built-In vs. Portable Fire Features
Built-in fire pits are constructed from stone, brick, or block and set into the hardscape, making them a fixed anchor for seating. Portable fire pits cost less upfront and move with your furniture, but lack the visual weight of masonry. For a backyard oasis that feels intentional, built-in wins; if you rent, move often, or want flexibility, portable is the smarter call.
| Feature | Built-In Fire Pit | Portable Fire Pit |
|---|---|---|
| Installation | Set into hardscape | No installation required |
| Durability | Decades with proper care | Several seasons |
| Best For | Permanent gathering spaces | Renters, flexible layouts |
| Maintenance | Annual inspection and cover | Regular cleaning and storage |
Outdoor Kitchen Layout Ideas for Real Entertaining Flow
Outdoor kitchen layout ideas should follow the same work triangle you’d use indoors: grill, prep surface, and storage within easy reach. When those three sit too far apart, the cook walks laps instead of hosting. The best outdoor kitchens are built around how you actually cook, not how they look in a photo.
Essential Features and Counter Space
Aim for at least 36 inches of continuous counter next to the grill for plating and staging. Include a dedicated trash pull-out and a small beverage fridge if you entertain often. Weather-resistant materials matter, since outdoor kitchens take sun, rain, and temperature swings year-round. Kingdom Paver builds custom outdoor kitchens with counters sized to your grill and guest count.
Shade, Lighting, and Comfort That Extend Patio Season
Shade and lighting determine how many hours a day your patio is usable. A pergola, retractable awning, or shade canopy blocks harsh afternoon sun, while layered lighting keeps the party going after dark: string lights overhead, path lights for safety, and a dimmable fixture near the dining area to shift the mood.
Comfort is the third leg of that stool. Outdoor rugs soften hardscape underfoot, weather-resistant cushions hold up through humid summers, and a ceiling fan or portable mister makes hot afternoons tolerable. These additions turn a patio into a room you actually use.
Shade, lighting, and comfort are the three upgrades that most reliably extend how many months per year you can entertain outdoors.
What Drives the Cost of Custom Patio Installation
The cost of custom patio installation depends on square footage, material choice, site prep, and how much custom work you want. Patio pavers cost more than poured concrete upfront, but they’re easier to repair and hold up better under heavy foot traffic. Add-ons like fire pits, outdoor kitchens, and shade structures each carry their own material and labor costs.
Pricing also shifts with drainage work, slope correction, and access to the build site. Rather than quote a number over the phone, we walk the property, measure, and give you a written scope. Reach out to Kingdom Paver for a quote tailored to your yard.
Accessibility, Smart Features, and Seasonal Transitions
Most patio guides treat accessibility as an afterthought, but universal design is the fastest way to make an entertaining space work for every guest, grandparents, someone on crutches, a friend in a wheelchair, a parent pushing a stroller. The same features that help those guests make the patio easier to host on, which is why aging-in-place remodelers now spec them by default.
Universal Design That Still Looks Like a Design Choice
The core rules borrow the logic of the Americans with Disabilities Act (ADA) Standards for Accessible Design, even though a private residence is not a public accommodation. Those dimensions are the simplest way to get a patio that works for everyone:
- Walkways: Keep primary circulation paths at least 36 inches wide, and 42 to 48 inches where two people pass or a wheelchair user needs to turn. Secondary paths to a fire pit or grill can be narrower, but 36 inches is the practical floor.
- Thresholds: Aim for a flush transition from house to patio. A half-inch vertical lip catches a walker or wheelchair caster. If grade forces a step, make it a single low rise with a beveled edge, not a two-step drop.
- Surface: Choose pavers with a slip-resistant finish (often labeled “textured” or “tumbled”) and keep joint sand topped off. Smooth, polished surfaces look great dry and become a hazard the first time someone spills a drink.
- Seating: Mix in at least one seat with arms and a firm cushion at standard chair height (roughly 17 to 19 inches from patio surface to seat top). Deep lounge chairs are comfortable for some guests and nearly impossible for others to get out of.
- Lighting: Put path lights on the walkway edges, not in the middle of the path, so the light source never sits in a guest’s eyes. Step lights on any grade change are non-negotiable.
None of this has to read as “medical.” A flush threshold, a 42-inch walkway, and a bench with arms look identical to good design, because they are.
Smart Features That Earn Their Cost
Smart-home integration is where most patio guides stop at “app-controlled lights.” The features that change how you host are tied to a trigger, not just a phone screen:
- Weather-sensing lighting and irrigation: A smart controller that skips a watering cycle after rain pays for itself in a season in most of the country. Pair it with a rain sensor on patio lighting so fixtures do not run in a downpour.
- Scene control: A single dimmer scene, “dinner,” “fire pit,” “cleanup”, beats five individual switches. Choose fixtures and controllers that support a standard smart-home protocol so you are not locked into one brand.
- Outdoor-rated smart plugs and heaters: An outdoor-rated smart plug lets you schedule a patio heater to warm the seating area 20 minutes before guests arrive. Check the plug’s amperage rating against the heater’s draw; most residential patio heaters pull 12 to 15 amps.
- Weatherproofing: Any smart device outdoors needs an enclosure rated for the exposure. “Damp location” is not the same as direct rain. Look for an IP rating (IP65 or higher) or a NEMA-rated enclosure.
Seasonal Transition Planning
A patio designed only for July sits unused from October through April. Design for the shoulder seasons instead:
- Shade in summer, sun in winter: A pergola with adjustable louvers or a retractable awning lets you dial sun exposure by season rather than committing to one.
- Wind: A low wall, a row of tall planters, or a screen panel on the prevailing-wind side extends usable evenings well into fall.
- Heat: A built-in fire pit or a few portable propane heaters push the comfortable window later in the year than any single piece of furniture.
- Storage: Cushions, grill covers, and small furniture need a dry home on the patio itself. A bench with lift-up storage or a weatherproof deck box keeps the space usable without a trip to the garage.
- Winterization: Before the first hard freeze, drain and blow out water lines serving an outdoor kitchen or sink, disconnect hoses, and store cushions. This prevents a cracked supply line from becoming a spring repair.
Accessibility, smart controls, and seasonal planning are the three upgrades that let a patio host guests across generations and across the calendar, not just on the perfect July evening.
Maintenance and Durability ROI
Most patio guides compare materials on upfront price and stop there. What matters over a 15- to 20-year horizon is total cost of ownership: installation plus every reseal, repair, replacement, and weekend you spend on it. Framed that way, the cheapest material at the register is rarely the cheapest patio.
Lifecycle Cost by Material
A useful comparison is cost per square foot per year of service life, not cost per square foot installed. Exact numbers vary by region, site access, and base prep, but the pattern is consistent:
- Poured concrete: Lowest upfront cost, but prone to cracking from freeze-thaw and soil movement. Repairs are visible patches, and widespread cracking often means full replacement. Service life is commonly 20 to 30 years with good base prep, less in clay soils without proper drainage.
- Paver systems: Higher upfront cost than concrete, but individual units can be lifted and reset when a utility line needs service or a section settles. That repairability is the core ROI argument, a cracked paver is a one-hour fix, a cracked slab a saw cut and patch.
- Natural stone: Highest upfront cost and longest service life when set on a proper base. Some stones (certain flagstones and slates) are more porous and need more frequent sealing.
- Decking (wood or composite): Wood needs staining or sealing every one to three years depending on climate. Composite needs less attention but can fade, scratch, or chalk, and some composites are not easily repaired in place.
The Interlocking Concrete Pavement Institute (ICPI) publishes maintenance guidance for paver systems, and following those intervals is one of the simplest ways to protect a custom patio over time. Interlocking Concrete Pavement Institute maintenance guidance
A Realistic Maintenance Schedule
A patio that gets a few hours of attention per year outlasts one that gets none. A common pattern:
- Every spring: Inspect joint sand and top off low spots. Sweep or blow off winter debris. Check drainage channels and clear leaf buildup.
- Every two to four years: Re-seal pavers, depending on climate and traffic. Sealing too often wastes money; too rarely lets joint sand wash out and weeds take hold.
- After any hard freeze: Walk the patio and look for heaved or settled sections. Catching settlement early is a reset; catching it late is a rebuild.
- Annually: Inspect any fire feature, outdoor kitchen gas line, and lighting connections. Gas and electrical work should be done by a licensed professional.
Durability Decisions That Pay Back
The highest-ROI durability choices are made before the first paver is laid:
- Base prep and drainage: A properly compacted, well-draining base is the biggest predictor of how a patio ages. Skipping it is the most expensive mistake in patio design, poor grading causes water pooling, cracked pavers, and sinking within a few seasons.
- Edge restraint: A hidden edge restraint keeps the paver field from spreading. It is inexpensive, almost invisible, and its absence is a common cause of early failure.
- Drainage slope: A minimum slope of roughly 1 to 2 percent away from the house moves water off the patio without making furniture wobble.
- Material match to climate: In freeze-thaw regions, choose pavers rated for that exposure and avoid tight-jointed, non-flexible surfaces that crack under movement.
Resale and Curb Appeal
Hardscape is one of the few home improvements that shows up in listing photos and appraisals. A well-maintained patio reads as an outdoor room, and buyers in master-planned communities often treat it as a differentiator rather than a line item. But ROI depends on maintenance: washed-out joints, weeds, and a settled corner read as a problem, not an asset. The schedule above keeps the resale story intact.
Skipping drainage planning is the most expensive mistake in patio design. Poor grading causes water pooling, cracked pavers, and sinking within a few seasons, and it is the failure most likely to void a material warranty claim.
Frequently Asked Questions
What is a good size patio for entertaining?
For a patio design that hosts 8 to 10 guests comfortably, plan for at least 300 to 400 square feet. That allows room for a dining table, a seating zone, and walking space between them. If you want an outdoor kitchen or fire pit, add another 100 to 150 square feet per feature. The goal is separate zones that don’t crowd each other, so guests can move between cooking, eating, and lounging without squeezing past furniture.
How can I incorporate fire features into my patio design?
Built-in fire pits work best when placed slightly off the main traffic path, usually 10 to 12 feet from seating so heat reaches guests without smoke in their faces. Pair the fire pit with a paver border that matches your patio for a seamless look. If you rent or want flexibility, a portable fire pit works too, but built-in units add more to resale value and last longer in outdoor conditions.
What features are essential for an outdoor kitchen?
At minimum, plan for a grill, a countertop with prep space, and storage for tools and fuel. A small sink and a mini fridge make hosting easier because you’re not running inside during the party. Layout matters more than appliance count: keep the grill, prep area, and serving surface within a few steps of each other. Work with an installer who can run gas, water, and electrical lines correctly the first time.
How much does a custom patio installation typically cost?
The cost of custom patio installation depends on square footage, paver material, site prep, and whether you add features like a fire pit or outdoor kitchen. Sloped yards or drainage corrections add labor. Because pricing varies so much by project, the best approach is to get a written quote based on your specific layout and materials rather than comparing generic per-square-foot numbers online.
Designing a patio that entertains well takes more than picking pretty pavers. It takes a layout that moves people, features that anchor the space, and construction that holds up season after season. Kingdom Paver brings ten years of experience, custom building solutions, and affordable pricing to every patio, outdoor kitchen, and fire pit we install. Get started with Kingdom Paver and build a backyard your guests won’t want to leave.


