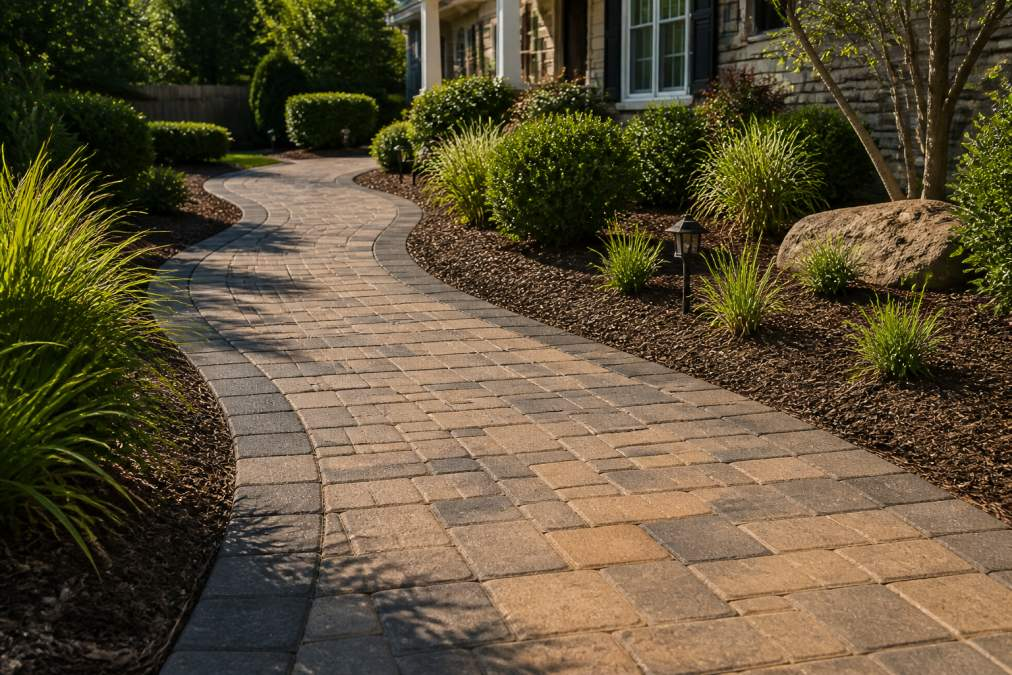
A well-designed walkway is far more than a practical path, it’s your home’s first impression, a reflection of character, and a significant investment in curb appeal and property value. The difference between a generic concrete slab and a thoughtfully designed custom walkway is stark: one fades into the background; the other becomes a defining feature of your exterior.
At Kingdom Paver, we’ve worked with homeowners who discovered that proper custom walkway design involves site analysis, drainage planning, material selection aligned with your home’s style, and installation techniques that ensure longevity. This guide walks you through every aspect of that process, from initial design concepts to long-term maintenance.
Best Materials for Outdoor Walkways
Pavers and Permeable Options
Pavers represent one of the most versatile choices for custom walkway design, offering aesthetic flexibility and practical durability. Unlike poured concrete, individual pavers allow you to create patterns, adjust for settling, and replace damaged sections without redoing the entire walkway. Permeable pavers allow water to drain through the surface into a prepared sub-base, addressing drainage concerns on sloped properties.
Permeable paver systems come in several forms: open-grid designs that let grass or gravel show through, pervious concrete pavers with tiny voids, and traditional pavers installed over a permeable base layer. The advantage emerges in areas prone to water pooling or on sloped sites where runoff becomes problematic. Instead of water sitting on the surface or creating erosion, it filters down through the base, reducing maintenance and improving landscape health.
The trade-off is upfront cost and installation precision. The sub-base preparation is demanding, requiring proper grading, geotextile fabric, and a stone base that allows water movement. If foundation preparation is rushed, the system fails to deliver drainage benefits. Professional installation is critical; the design and build phase determines whether you get a 15-year walkway or one that fails after three years.
Close-up of various paver materials arranged side by side, bluestone pavers, clay brick pavers, permeable concrete pavers, and traditional concrete, showing distinct colors, textures, and surface finishes in natural daylight
Bluestone, Brick, and Concrete Alternatives
Bluestone offers a premium aesthetic with blue-gray tones and natural cleft surface that create visual interest. It’s durable and weathers gracefully, developing a subtle patina. However, it’s significantly more expensive than pavers and concrete, and natural stone variation means some homeowners love the character while others find it inconsistent.
Brick walkways deliver a timeless aesthetic that complements colonial and cottage-style homes. Authentic clay brick develops a warm patina and integrates beautifully with established landscapes. The downside is that brick is softer than concrete or stone pavers, meaning it can chip or crack under heavy loads or freeze-thaw stress. Brick also requires more frequent maintenance, with moss and algae growth common in shaded areas.
Concrete remains the most economical choice and offers durability when properly installed. Standard broom-finished concrete provides slip resistance. Two-tone concrete, where you expose aggregate or add coloring, elevates the basic slab into something more intentional. Stamped concrete can mimic stone or brick patterns, though the pattern tends to wear unevenly over time. The limitation of concrete is its monolithic nature; once it cracks, repair options are limited.
Walkway Design Ideas for Front Yards
Modern, Rustic, and Traditional Styles
Modern custom walkway design emphasizes clean lines, minimalist plant integration, and geometric precision. Straight pathways with sharp angles, neutral material palettes (gray concrete, dark pavers), and integration with hardscape elements suit contemporary homes and master-planned communities.
Rustic designs embrace natural materials and softer lines. Curved pathways, mixed material combinations, and integration of native plantings create a walkway that feels like a natural extension of the landscape. Rustic styles suit older homes and wooded lots, though the line between "charming" and "neglected" requires careful maintenance.
Traditional designs balance formality with accessibility. Symmetrical layouts, classic material choices (brick or bluestone), and structured plantings create permanence and intentionality. This style tends to age well and remains visually relevant across decades.
Finished front yard walkway with curved geometric paver pattern leading to home entrance, mature landscaping visible on both sides with defined planting beds, professional installation visible in clean joints and level surface, warm afternoon sunlight casting subtle shadows
Curved Pathways and Geometric Patterns
Curved pathways create visual interest and soften the transition between hardscape and landscape. A gentle curve invites movement and creates layered views of your property. Curves also provide practical benefits: they allow you to navigate around existing trees rather than removing them, and they can improve drainage by directing water along the path.
Geometric patterns, whether hexagonal pavers, herringbone brick, or radial stone arrangements, transform a utilitarian surface into a design focal point. These patterns require precise layout and professional installation to look intentional. Classic patterns like herringbone or simple running bond remain visually relevant longer than trendy styles.
Site Analysis and Foundation Preparation
Site Survey and Grading Considerations
Before any material touches the ground, a proper site survey determines the walkway’s success. This involves measuring elevation changes, identifying drainage patterns, noting existing utilities, and understanding how water moves across your property during heavy rain. Many homeowners skip this step, assuming the walkway can follow the most direct path. In reality, that direct path might be where water naturally collects or where utility lines run underground.
Grading, the slope and pitch of the finished walkway, is critical for drainage and safety. A walkway should slope slightly (typically ¼ inch per foot minimum) to shed water and prevent pooling. On sloped properties, this becomes more complex, potentially requiring steps or level sections. Site grading also affects accessibility; excessive slope creates tripping hazards and makes navigation difficult.
Drainage Solutions for Slopes and Water Pooling
Water pooling in walkway sections indicates improper grading, inadequate sub-base preparation, or a drainage system not designed for your property’s water movement patterns. Understanding where water comes from, rainfall, runoff from higher elevations, or groundwater, is essential to solving this problem.
For properties with significant slopes, French drains installed alongside the walkway intercept water before it reaches the surface. A French drain is a trench filled with gravel and a perforated pipe that directs water away from the walkway. This is particularly effective on hillside properties where water naturally moves downslope.
Permeable base layers address water landing directly on the walkway surface. Using gravel or permeable material beneath pavers or concrete allows water to infiltrate downward rather than pooling on top. The key is adequate depth (typically 4-6 inches of well-draining stone base) and proper compaction. On clay-heavy soils, a geotextile fabric layer prevents fine soil particles from clogging the drainage layer.
Paver Walkway Installation Cost and Budget Planning
DIY vs. Professional Installation
The appeal of DIY walkway installation is obvious: you save labor costs and maintain control. For straightforward concrete pours on level ground, DIY is feasible for experienced homeowners. For pavers, curved pathways, drainage solutions, or sloped sites, professional installation delivers dramatically better results and prevents costly mistakes.
Hidden DIY costs add up quickly: rental equipment, material waste from mistakes, and time investment. More critically, improper sub-base preparation, inadequate compaction, or incorrect grading leads to settling, cracking, and water pooling within 1-2 years. Fixing these problems costs more than professional installation would have initially.
Professional installation ensures proper foundation preparation, correct material selection for your climate, appropriate grading for drainage, and installation techniques that account for freeze-thaw cycles and soil conditions. Kingdom Paver’s approach includes site analysis before work begins, ensuring your custom walkway design accounts for your property’s specific conditions. Professional installation typically extends your walkway’s lifespan by 5-10 years compared to DIY approaches, making it the more economical choice over time.
Safety, Accessibility, and Building Code Compliance
ADA Compliance and Slip Resistance
Accessibility standards establish minimum requirements for walkway slope, width, and surface texture. A compliant walkway must be at least 36 inches wide (48 inches preferred), have a maximum slope of 1:20 (5%), and feature a slip-resistant surface. These standards reflect decades of data about what allows people with mobility challenges to navigate safely.
Slip resistance becomes critical in wet climates or shaded areas where algae and moss growth is common. Broom-finished concrete provides better slip resistance than smooth concrete. Pavers with textured surfaces outperform smooth stone. If using smooth materials like polished bluestone, consider adding a non-slip coating or textured sealant to improve safety.
Proper drainage directly supports accessibility. A walkway that pools water after rain is hazardous for anyone with mobility limitations and accelerates material degradation. Designing your custom walkway with appropriate slope and drainage solutions creates a safer surface for all users while extending lifespan.
Permits and Local Building Codes
Building permit requirements vary by jurisdiction, but most municipalities require permits for hardscape projects exceeding a certain size or involving drainage modifications. Permits ensure work meets safety standards, doesn’t interfere with utilities, and complies with local grading and stormwater regulations. Skipping permits creates liability and can complicate future property sales.
Local building codes address material specifications, foundation depth requirements, slope limitations, and drainage standards. Some jurisdictions have specific requirements for permeable surfaces or restrictions on impervious hardscape coverage. Understanding local codes before design begins prevents costly redesigns or delays.
Working with an experienced contractor like Kingdom Paver means navigating permitting becomes their responsibility. They understand local code requirements and ensure your custom walkway design meets all applicable standards.
The Custom Walkway Installation Process
Step-by-Step Project Timeline
A typical custom walkway project follows this sequence, though timeline varies based on scope, site conditions, and weather:
Week 1-2: Site Analysis and Design
Professional site survey, grading assessment, drainage evaluation, and design development.
Week 2-3: Material Selection and Permitting
Final material selection, permit applications if required, and material ordering.
Week 3-4: Foundation Preparation
Excavation, sub-base installation, compaction, and grading. Proper compaction requires specialized equipment and multiple passes.
Week 4-5: Surface Installation
Paver placement, concrete pouring, or stone setting. Weather affects this phase.
Week 5-6: Finishing
Joint filling, sealing, cleanup, and final grading adjustments.
The entire process typically takes 4-6 weeks from initial consultation to completion, though complex projects with drainage modifications may extend to 8-10 weeks. A professional contractor provides realistic timelines based on your specific project scope.
Maintenance and Long-Term Durability
Your custom walkway design and build investment requires ongoing maintenance to preserve appearance and function. Annual maintenance includes cleaning debris, checking for settling or cracking, and resealing surfaces as needed. Most sealers last 2-3 years before requiring reapplication.
Seasonal considerations matter. In freeze-thaw climates, salt application accelerates material degradation; use salt-free ice melt products instead. In humid climates, moss and algae growth is common on shaded surfaces; annual pressure washing prevents slippery conditions and staining.
Permeable pavers require slightly different maintenance. The permeable base layer needs periodic cleaning to prevent clogging with fine soil particles. If drainage performance declines over time, the base layer may need replacement after 10-15 years of use.
The difference between a walkway that merely functions and one that enhances your property comes down to thoughtful design, proper installation, and informed material selection. Your custom walkway design and build is a long-term investment that affects daily movement through your yard, curb appeal, and property value. Working with experienced professionals who understand site-specific challenges, drainage patterns, soil conditions, local codes, and climate impacts ensures your walkway performs beautifully for years. Kingdom Paver brings a decade of experience in designing and building custom walkways that integrate seamlessly with your landscape while delivering the durability and low maintenance you deserve. Contact Kingdom Paver for a site consultation and project estimate tailored to your property’s specific needs.
Frequently Asked Questions
What is the best material for an outdoor walkway?
The best material depends on your climate, foot traffic, and aesthetic goals. Pavers offer flexibility and durability, while bluestone provides a natural look. Permeable pavers manage drainage in wet climates. Concrete is cost-effective but less visually distinctive. Consider weather resistance, maintenance requirements, and how each material integrates with your landscape when making your choice.
How much does paver walkway installation cost?
Costs vary based on material selection, walkway size, site complexity, and labor in your area. Professional installation ensures proper foundation preparation and drainage, which prevents costly repairs later. For an accurate estimate, contact a local contractor for a site survey and project quote. Investing in quality installation protects your long-term durability.
Do I need a permit for a new walkway?
Permit requirements depend on your local building codes and whether the walkway affects drainage, grading, or property lines. Some jurisdictions require permits for walkways over a certain width or in specific locations. Check with your local building department before starting. Professional contractors typically handle permit applications as part of the project scope.
Can I build a custom walkway myself, or should I hire a professional?
DIY installation is possible if you have experience with site grading, sub-base preparation, and drainage. However, improper foundation work causes sinking, cracking, and water pooling, expensive problems to fix. Professionals handle site analysis, structural integrity, and ADA compliance correctly the first time. For sloped yards or complex drainage needs, professional installation is strongly recommended.