
Table of Contents
- Site Assessment and Planning for Your Paver Driveway Installation
- Excavation and Subgrade Preparation
- Paver Driveway Sub-Base Depth Requirements
- Base Layer Installation and Edge Restraint Setup
- Bedding Layer Preparation and Paver Laying Patterns
- Compaction Techniques and Joint Sand Application
- How to Prevent Weeds in Paver Driveways
- Paver Driveway vs Concrete Cost and Long-Term Durability
Last Updated: August 26, 2026
Site Assessment and Planning for Your Paver Driveway Installation
Before laying a single paver, evaluate existing conditions. Walk the driveway area and note standing water, drainage patterns, and soil settling. Take photographs and document the slope, most driveways need a minimum 1-2% slope to shed water effectively.
Assess soil type by digging test holes 12 inches deep in several spots. Sandy soil drains quickly but compacts poorly. Clay-heavy soil holds moisture and shifts seasonally. Loamy soil is ideal but uncommon. Your soil type determines base layer depth and whether additional drainage measures are needed.
Consider your region’s freeze-thaw cycles. Areas with repeated freezing and thawing require deeper base preparation than warmer climates. The frost line, the depth soil freezes during winter, dictates excavation depth. Northern regions may reach 4 feet; moderate climates typically 12-18 inches (usda.gov). Understanding your local frost line prevents heaving and settling that destroys paver driveways within years.
Document intended use. A residential driveway for personal vehicles has different load-bearing requirements than one servicing delivery trucks or RVs. Plan your paver layout before breaking ground. Measure precisely and sketch your pattern, running bond, herringbone, or basket weave. Herringbone patterns provide superior load-bearing capacity because interlocking angles transfer weight more efficiently across the surface.
Excavation and Subgrade Preparation
Excavation depth is critical. In moderate climates with stable soil, 6-8 inches of total base material suits light residential use. In freeze-thaw zones or on clay soils, 8-12 inches is necessary. This prevents subgrade shifting and uneven paver settling.
Remove vegetation, roots, and organic matter, then dig to expose stable soil. Remove any old asphalt or concrete. Use a plate compactor to compress the exposed subgrade to 95% standard proctor density, soil compacted to resist further settling under normal loads (astm.org).

Check drainage slope as you work. The subgrade should slope away from structures at minimum 1-2% grade. Verify with a level and measure tape. If your site has poor natural drainage, install a perforated drain line along low points before adding base material.
Compact the subgrade in 2-3 inch lifts. Add material, compact thoroughly, then add another layer. This ensures uniform density throughout. Uneven compaction creates soft spots where pavers eventually sink.
If soil is predominantly clay or silt, lay geotextile fabric over the compacted subgrade before adding base course. This prevents fine soil particles from migrating into aggregate, compromising drainage and creating voids over time.
Paver Driveway Sub-Base Depth Requirements
The sub-base is aggregate material between subgrade and bedding sand. Its thickness determines load distribution and drainage effectiveness.
For residential driveways in moderate climates, a 4-inch compacted base course is minimum. In freeze-thaw zones or poor soils, 6-8 inches is standard. This depth distributes vehicle loads across wider soil area, reducing point loads that crack pavers.
Understanding Frost Line and Load-Bearing Capacity
The frost line defines minimum excavation depth. When soil freezes, water expands, pushing upward. Frost heave can lift pavers 1-2 inches, causing uneven surfaces and cracked joints. Below the frost line, soil temperature remains constant year-round, preventing this movement.
Contact your county extension office or check the USDA hardiness zone map for your local frost line. Your total excavation should extend at least to that depth. If the frost line is 18 inches and you’re using 4 inches of base material, excavate 14 inches into subgrade.
Residential vehicles typically weigh 3,000-4,500 pounds (nhtsa.dot.gov). A properly prepared 4-inch base with compacted subgrade handles this easily. Delivery trucks or RVs require deeper base material or reinforced pavers designed for heavy traffic.
Base Layer Installation and Edge Restraint Setup
The base course is typically 3/4-inch crushed stone or recycled asphalt. Spread material evenly to your planned depth (usually 4-6 inches before compaction), then compact thoroughly using a plate compactor until material no longer shifts underfoot.

Install edge restraint around the entire perimeter simultaneously with base work. Edge restraint, typically plastic or metal edging, prevents pavers from spreading outward under load. Secure it with stakes every 2-3 feet, positioned just below the finished paver surface.
Proper edge restraint separates a durable installation from one that fails. Without restraint, outer pavers gradually shift outward, opening joints that allow water infiltration and weed growth. Over 3-5 years, this spreading becomes visible and structural integrity is compromised.
Compact the base layer in 2-inch lifts. Check slope periodically, the base should maintain the same 1-2% drainage slope as your subgrade. Use a straightedge and level to verify.
Bedding Layer Preparation and Paver Laying Patterns
The bedding layer is 1-1.5 inches of coarse sand (bedding sand or paver sand) directly under pavers. This allows minor leveling adjustments and provides a stable base. Spread sand evenly and use a straightedge to level it. The surface should be smooth and flat.
Paver laying patterns affect both aesthetics and durability. Running bond (offset rows) is most common and provides good load distribution. Herringbone patterns offer superior load-bearing capacity because 45-degree angles transfer weight more efficiently. Basket weave patterns are attractive but provide less structural integrity for driveways.
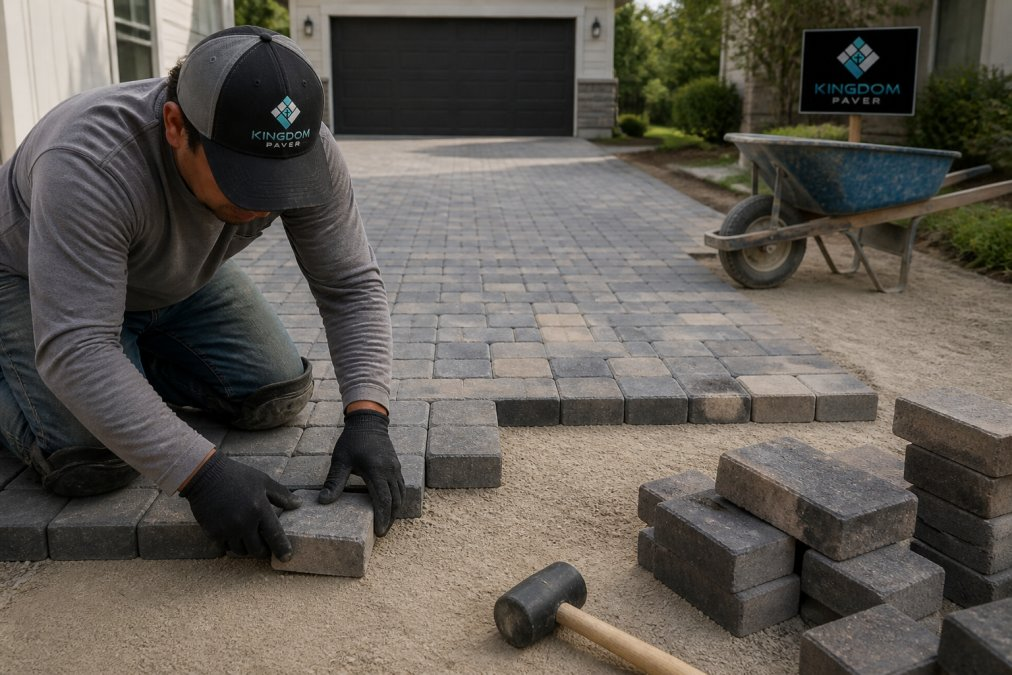
Begin laying pavers from one corner, working systematically across the area. Use a rubber mallet to tap pavers into bedding sand, maintaining consistent spacing (typically 1/8 inch). Check frequently with a level to ensure even sitting. When cuts are necessary, use a masonry saw with a diamond blade.
Compaction Techniques and Joint Sand Application
Once all pavers are laid, compact the entire surface using a plate compactor with a rubber or urethane pad. Make multiple passes in overlapping rows to ensure every paver is firmly seated and won’t shift under vehicle weight.
After compaction, sweep polymeric sand (containing binding agents) across the entire surface. Sweep diagonally across pavers to ensure complete joint coverage. Once joints are filled, lightly mist the surface with water to activate polymeric binders. Follow manufacturer’s instructions for curing time, typically 24-48 hours before vehicle traffic. Avoid heavy rain during curing.
Proper compaction is critical for long-term durability. Inadequately compacted pavers shift under repeated traffic, opening joints and allowing water penetration.
How to Prevent Weeds in Paver Driveways
Weeds emerge in paver joints when sand settles or polymeric sand fails to cure properly. Use polymeric sand rather than standard sand, binding agents create a hostile environment for weed germination.
Maintain joint sand levels. As sand settles over time, gaps allow weeds to establish. Top-dress annually with polymeric sand, sweeping it into joints and lightly misting to activate. For existing weeds, use targeted herbicide or remove with a thin tool, then refill joints with fresh polymeric sand.
Consider applying paver sealant every 2-3 years. Quality sealers protect pavers from staining and UV damage while stabilizing joint sand, extending driveway life significantly.
Paver Driveway vs Concrete Cost and Long-Term Durability
Concrete driveways typically cost less upfront but crack as they age, allowing water infiltration and deterioration. Concrete typically requires replacement after 25-30 years.
Paver driveways, when properly installed, last 50+ years. Individual pavers can be replaced if damaged, whereas concrete requires full-section replacement. This modularity provides significant long-term value advantage.
Maintenance costs differ as well. Concrete requires periodic sealing and crack repair. Paver driveways require joint sand top-dressing and occasional sealant application, simpler and less expensive. Over 30 years, total maintenance costs typically favor pavers.
In freeze-thaw zones, concrete deteriorates faster due to ice damage. Pavers handle these cycles better because individual units can shift slightly without cracking. Pavers also offer superior aesthetic flexibility with countless colors, textures, and patterns.
A durable paver driveway installation requires proper planning, correct depth calculations, and meticulous execution of each layer. Many homeowners attempt this as a DIY project and encounter settling or cracking within years due to inadequate base preparation or improper compaction. Professional installation ensures your driveway performs as intended. At Kingdom Paver, we handle site assessment, excavation, base preparation, and professional compaction, ensuring your investment lasts decades rather than years. Contact Kingdom Paver today for a consultation and quote on your paver driveway project.
| Installation Step | Typical Depth | Key Material | Critical Check |
|---|---|---|---|
| Subgrade preparation | Variable | Compacted native soil | 95% density, proper slope |
| Base course | 4-6 inches | 3/4" crushed stone | Uniform compaction, drainage slope |
| Bedding layer | 1-1.5 inches | Coarse sand | Level surface, no depressions |
| Paver placement | Per manufacturer | Interlocking pavers | Consistent spacing, level surface |
| Joint sand | Fill all gaps | Polymeric sand | Complete coverage, proper curing |
The difference between a paver driveway that fails in 5 years and one that lasts 50 comes down to what happens before the first paver is laid. Proper site assessment, correct excavation depth, adequate base material, and professional compaction create conditions for long-term durability. Cut corners on any step and you’re gambling with your investment. The techniques outlined here represent proven best practices developed through thousands of installations. For homeowners in the area seeking professional installation that guarantees durability, Kingdom Paver combines experienced workmanship with attention to engineering principles that prevent common failures. Our team understands local soil conditions, frost lines, and drainage challenges specific to your region, factors that determine whether your driveway remains beautiful and functional or becomes a source of frustration within years.
Frequently Asked Questions
Q: What are common paver installation mistakes to avoid?
A: The most frequent mistakes include insufficient base depth, inadequate compaction of the subgrade and base layers, improper drainage slope, and failing to install edge restraints. Skipping geotextile fabric under the base course allows soil migration, causing settling. Many installers also rush the bedding layer screeding, resulting in uneven pavers. Poor joint sand application, either too little or using non-polymeric sand, leads to weed growth and joint instability. Proper paver driveway installation requires patience at each stage to prevent costly repairs.
Q: How do I prepare my driveway for a paver installation?
A: Start with a thorough site assessment to identify drainage issues, existing damage, and slope requirements. Remove the old surface completely and excavate to the correct depth based on your frost line and load-bearing needs. Compact the subgrade firmly using a plate compactor, then install geotextile fabric to prevent soil migration. Add the aggregate base course in 2-inch lifts, compacting each layer. Check for proper drainage slope (typically 1-2% grade) to prevent water pooling. Finally, install edge restraints around the perimeter before laying pavers.
Q: What is the importance of edge restraints in paver installation?
A: Edge restraints are critical for maintaining structural integrity and preventing lateral paver movement. They contain the paver field, especially under vehicle loads and freeze-thaw cycles. Without proper edge restraint installation, pavers shift outward, creating gaps that allow weeds and water infiltration. This leads to joint sand loss and accelerated settling. Quality edge restraints, whether concrete, plastic, or steel, should be securely fastened and extend below the base layer to anchor the entire system effectively.
Q: How long does a paver driveway typically last?
A: A properly installed paver driveway can last 25 years or longer with routine maintenance. Durability depends on base thickness, compaction quality, drainage design, and climate conditions. In areas with harsh freeze-thaw cycles, thicker base courses and proper slope are essential. Regular sealing, joint sand replenishment, and weed prevention extend the lifespan significantly. Poor installation shortcuts, thin base, inadequate compaction, or drainage issues, can reduce lifespan to 10-15 years, making proper installation techniques the best investment.
Q: How do I properly prepare the sub-base for a paver driveway?
A: Sub-base preparation is foundational to driveway durability. Excavate to the correct depth based on your frost line and expected load-bearing capacity. Compact the subgrade thoroughly using a plate compactor to achieve proper compaction density. Install geotextile fabric to separate soil from the base course and prevent migration. Add aggregate base in 2-inch lifts, compacting each layer completely. The total base thickness typically ranges from 4 to 8 inches depending on climate and soil conditions. Proper screeding ensures an even surface for bedding layer installation.
Q: Is it better to lay pavers in concrete or sand?
A: Sand (specifically a screeded bedding layer) is the standard for residential paver driveways because it allows for flexibility, easier repairs, and better drainage. A concrete base is rigid and can crack under freeze-thaw stress, potentially damaging pavers. However, the aggregate base course beneath the sand bedding should be compacted stone, not concrete. This layered approach, compacted base course plus sand bedding, provides the optimal balance of load-bearing capacity, drainage, and longevity for a durable paver driveway.
Q: What drainage slope is necessary for a paver driveway?
A: A drainage slope of 1-2% is standard for paver driveways to prevent water pooling and surface runoff issues. This means the driveway should drop about 1-2 inches per 10 feet of length. Proper site grading directs water away from structures and toward drainage areas. Without adequate slope, water accumulates in low spots, accelerating freeze-thaw damage and weed growth. During site assessment, measure existing grades and plan the new installation to meet or exceed this slope requirement for long-term durability.
Q: How do I prevent weeds from growing between pavers?
A: Weed prevention requires multiple steps: use polymeric sand in joints instead of regular sand, as it hardens when wet and blocks weed seeds. Install geotextile fabric under the base course to prevent soil-borne seeds from migrating upward. Maintain proper joint sand levels by replenishing as needed. Apply a quality sealer to the paver surface annually to create a protective barrier. Regular sweeping removes debris that traps moisture and seeds. For existing weeds, remove them promptly and reseal joints with polymeric sand to prevent regrowth.
This article was written using GrandRanker


