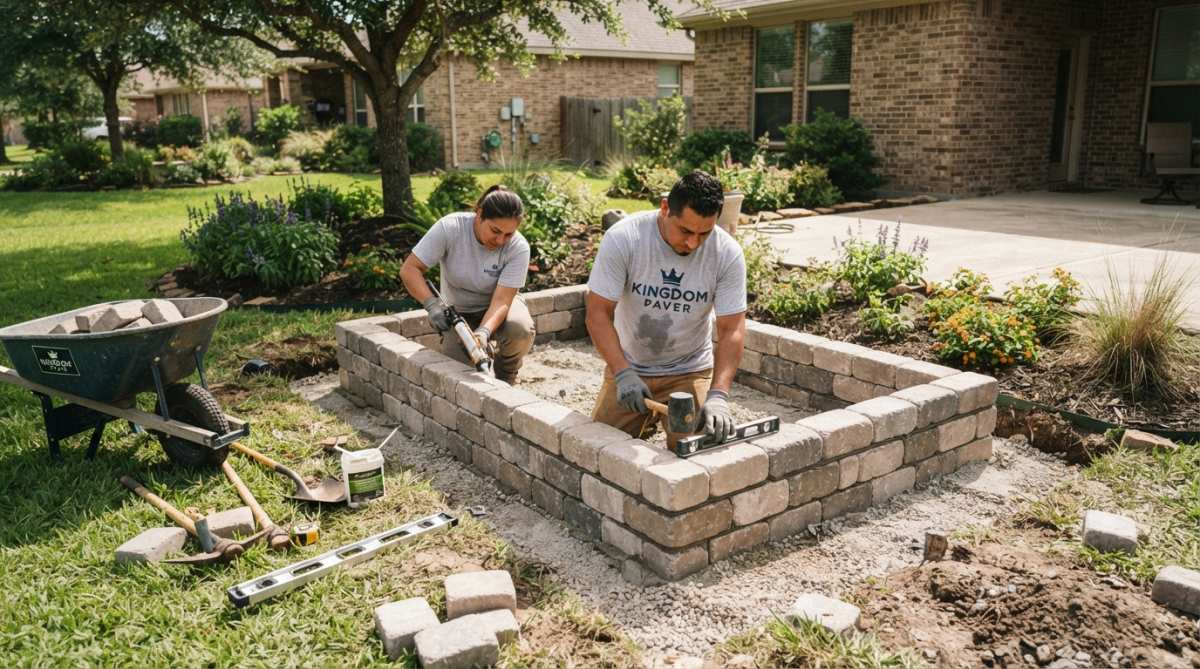
Concrete pavers are affordable and work well for most residential gardens in moderate climates. Standard 2-2.5 inch pavers suit beds up to 18 inches tall; use reinforced pavers (3+ inches) or rebar for taller beds. Concrete may spall in freeze-thaw cycles.
Natural stone pavers (slate, limestone, granite) last 20+ years and resist freeze-thaw damage better than concrete. They provide structural integrity for tall beds without reinforcement but cost 2-3 times more and require precise installation due to irregular thickness.
Brick pavers offer classic appearance and 15-20 year durability with greater structural stability than concrete. Use full-thickness brick (not veneer); it resists spalling in freeze-thaw zones better than concrete.
Porcelain pavers resist staining and freeze-thaw damage due to non-porous composition, but are expensive and unnecessary for most residential gardens unless you live in extreme climates.
Structural considerations by bed height:
For beds 12-18 inches tall, standard 2-2.5 inch concrete or brick pavers work fine without reinforcement. The soil pressure is manageable, and dry-stacking (no mortar) is sufficient.
For beds 18-24 inches tall, use pavers at least 2.5-3 inches thick, or consider adding a mortar bed between courses. Mortar bonds pavers together and prevents individual units from bowing outward under soil pressure. Alternatively, use natural stone or reinforced concrete pavers, which have greater compressive strength.
For beds over 24 inches tall, structural reinforcement becomes necessary. Options include:
Installing vertical rebar (1/2-inch diameter) every 2-3 feet along the interior perimeter, extending from the base to near the top. Rebar prevents the paver wall from bowing outward.
Using a full mortar bed (not just sand) between all courses, which creates a monolithic structure that distributes soil pressure evenly.
Switching to a retaining wall system (engineered blocks with interlocking pins) instead of standard pavers. These are designed for the structural demands of tall raised beds.
Material selection by climate:
In freeze-thaw zones, choose brick, natural stone, or porcelain over thin concrete. If using concrete, select air-entrained pavers with air pockets that prevent cracking.
In hot, dry climates, concrete and porcelain perform well. Natural stone may require sealing every 2-3 years to prevent staining and weathering.
In areas with heavy rainfall, prioritize materials with low water absorption (porcelain, granite, sealed brick). Unglazed concrete absorbs water and may develop algae or moss on the surface.
Site Preparation and Excavation
Proper site preparation determines whether your bed stays level or sinks. Most DIYers skip this step and regret it within two years.
Mark your perimeter with paint or chalk. A 4 × 8 foot rectangular bed is standard and easy to work with.
Remove all grass, weeds, and vegetation completely; don’t bury them. Decomposing vegetation underneath causes settling.
Excavate 4-6 inches deep for your base layer. Uneven excavation leads to uneven pavers, so level the surface carefully.
Check soil composition as you dig. Clay drains poorly; sandy soil drains too fast. Most gardens benefit from compost or topsoil amendment.
Compact the excavated surface with a hand tamper. A loose base causes pavers to shift and frost heave in winter.
DIY Garden Bed Construction Tools and Installation Process
Measuring and Marking the Perimeter
Use a tape measure and mark corners with stakes and string. Check corners are square by measuring diagonals, they should be equal.
Mark the perimeter with chalk or paint to guide excavation and ensure straight edges.
View the marked area from different angles and adjust if needed before digging.
Installing the Base Layer and Compacting the Sub-base
Pour 2-4 inches of crushed stone for drainage and a stable foundation. Skipping this step causes water pooling and paver cracking.
Spread the crushed base evenly and rake it roughly level.
Compact the base layer firmly with multiple passes. A loose base is the number-one cause of pavers sinking after installation.
Add 1-2 inches of leveling sand (coarser than regular sand) on top of the compacted base to fine-tune paver height.
Overhead view of a completed raised flower bed with pavers showing finished perimeter with level surface, compacted base visible at edges, and prepared soil ready for planting
Laying and Leveling the First Course of Pavers
Lay the first paver in one corner and tap it gently with your mallet. Check with your level; it should be perfectly level or slope slightly for drainage.
Continue laying pavers along one edge, checking level frequently and adjusting sand as needed.
Keep gaps between pavers consistent (1/4-1/2 inch) for a professional look and proper drainage.
Securing Pavers and Adding Additional Courses
Once your first course is level, apply landscape fabric over the crushed base before adding the second course to prevent soil migration and weeds.
Lay the second course, staggering pavers like bricks for greater strength.
Tap each paver with your mallet and check level as you go.
Continue adding courses to your desired height. Taller beds require thicker pavers and structural support.
For beds over 24 inches tall, consider adding a retaining wall structure or reinforcement. Soil pressure increases with height, and regular pavers may bow outward over time.
Raised Bed Drainage Tips for Long-Term Success
Proper drainage is essential for plant health and structural longevity. Poor drainage kills plants and destabilizes pavers.
Calculating soil volume and accounting for drainage layers:
Before you learn how to build a raised flower bed with pavers, calculate how much soil you’ll need. This is where most DIYers go wrong, they buy soil without accounting for the drainage layer, then run short or overbuy.
For a raised bed with interior dimensions of 4 feet × 8 feet × 18 inches tall:
Subtract the drainage layer depth. A proper drainage layer is 2-3 inches of gravel at the bottom. This is not soil; it’s structural.
Remaining soil depth = 18 inches − 3 inches (drainage) = 15 inches of actual planting soil.
4 × 8 × (15 ÷ 12) ÷ 27 = 1.78 cubic yards of topsoil and compost.
Most plants in raised beds need 12-18 inches of soil depth. If your bed is 24 inches tall, use 3-4 inches of drainage layer, leaving 20-21 inches for soil. Shallow soil (under 12 inches) limits root depth and requires more frequent watering.
Weed barrier placement and trade-offs:
Landscape fabric is often recommended but its placement matters significantly. There are two approaches:
Option 1: Fabric over the crushed base (before soil). This prevents soil from migrating into the gravel layer below and blocks weeds from growing up through the pavers. Pros: effective weed control, prevents soil loss. Cons: can trap water if not perforated, and over time, roots may grow through it anyway.
Option 2: No fabric, direct soil-to-gravel contact. This allows better water drainage and root penetration into the gravel layer. Pros: superior drainage, roots can extend deeper. Cons: weeds may eventually grow through from below, and soil fines (clay particles) gradually migrate into the gravel, reducing its drainage capacity over 3-5 years.
Recommendation: Use perforated landscape fabric (not solid plastic) over the crushed base. Perforation allows water to drain while blocking soil migration. Avoid non-perforated plastic, which traps water and causes root rot.
Drainage layer design:
Place 2-3 inches of gravel (3/4-inch crushed stone, not pea gravel) at the bottom of your bed before adding soil. This creates a capillary break, a layer where water moves freely instead of pooling. Pea gravel is too small and compacts, reducing drainage. Crushed stone maintains its structure and allows water to flow.
For beds in areas with heavy rainfall or poor native drainage, add a perforated drain pipe (4-inch PVC with 1/4-inch holes) along the base of the bed, running the length of the longest side. Slope the pipe slightly (1/8 inch per foot) toward an outlet (a rain garden, downspout, or low point in your yard). This actively moves water away from the structure instead of relying on passive drainage.
Slope and surface management:
Slope the soil surface very slightly (1/8 inch per foot) toward one edge if possible.
Seasonal drainage adjustments:
Common Mistakes to Avoid
The most common mistake is skipping the base layer entirely. Pavers laid directly on soil shift and crack within one season. The crushed base is not optional, it’s the foundation of durability.
Frequently Asked Questions
Can I lay pavers directly on dirt for a raised flower bed?
No. Laying pavers directly on dirt causes uneven settling, shifting, and frost heave damage over time. Always install a compacted crushed base layer at least 2-4 inches thick beneath your pavers. This foundation prevents drainage problems, maintains structural integrity, and ensures your raised flower bed stays level for years.
What is the best base material for a raised paver bed?
Crushed limestone or crushed granite works best as a sub-base material. Spread 2-4 inches of crushed base, then compact it thoroughly with a hand tamper or plate compactor. For additional stability, add 1 inch of leveling sand on top of the compacted base before laying pavers. This combination provides proper drainage and prevents settling.
Do I need to use mortar when building a paver flower bed?
For most DIY raised garden beds, mortar is optional. Dry-stack construction using a compacted base and sand works well for smaller beds. However, mortar improves structural integrity for taller beds (over 12 inches) and prevents weed growth between pavers. If using mortar, apply it between courses and allow proper curing time before adding soil.
How high can I stack pavers for a flower bed without a retaining wall system?
For dry-stack construction, limit height to 12-18 inches without additional reinforcement. Beyond that, consider a retaining wall system or add landscape fabric and structural reinforcement behind the pavers to prevent soil pressure from causing collapse. Taller beds also benefit from mortar between courses for added stability.