Building an outdoor kitchen requires serious electrical planning, which is why an outdoor kitchen lighting and electrical planning guide is essential for homeowners. Most homeowners underestimate load demands and safety requirements, leading to code violations, tripped breakers, and dangerous situations.
Start with a load calculation: add up the wattage of every appliance and fixture you plan to install. Outdoor kitchens typically demand 40-60 amps of dedicated circuit capacity, though custom builds can exceed this.
Circuit capacity and load calculations
List every device and its wattage: a typical grill draws 10,000-15,000 watts, a refrigerator adds 600-800 watts, and LED lighting ranges from 500-2,000 watts. Add a 20-30% safety margin to prevent overloading circuits and leave room for future equipment.
Divide your total load by the available voltage (usually 240 volts for major appliances) to get required amperage.
GFCI protection and grounding standards
GFCI (Ground Fault Circuit Interrupter) protection is non-negotiable outdoors. According to the National Electrical Code requirements for outdoor installations, all outdoor receptacles must have GFCI protection. This technology detects ground faults and cuts power in milliseconds, preventing electrocution.
Grounding is equally critical. Outdoor systems need a ground rod driven at least 8 feet into the earth, bonded to your home’s grounding system, providing a safe path for fault current and protecting equipment from lightning and surges.
Planning Your Outdoor Kitchen Lighting Layout
Lighting design determines how functional and enjoyable your outdoor kitchen becomes, making it a critical component of any outdoor kitchen lighting and electrical planning guide. Poor lighting creates shadows over work surfaces and makes the space feel cramped after sunset. Strategic lighting solves this by creating distinct zones, each with its own purpose and intensity.
Zoning your space for functional lighting
Divide your outdoor kitchen into four zones: cooking, prep, dining, and pathways. The cooking zone demands 50-75 foot-candles directly over the grill; prep needs 30-50; dining and seating work with 10-20 for ambiance; pathways require 5-10 for safety without overwhelming brightness.
Plan fixture placement before running electrical. Mount task lighting 24-36 inches above work surfaces, angled to eliminate shadows cast by the person working. Position ambient lighting higher, 8-10 feet above seating areas, to spread light evenly without creating harsh shadows.
Calculating lighting levels and color temperature
Foot-candles measure illumination intensity; use a light meter or smartphone app to verify levels during installation.
LED fixtures deliver precise color temperatures and consume 75% less energy than incandescent bulbs; a 12-watt LED matches a 60-watt incandescent while cutting electricity costs and heat. Prioritize fixtures rated IP65 or higher to survive rain, snow, and humidity without corrosion.
Task Lighting for Cooking and Prep Areas
Task lighting is your primary work light. Mount it directly above the grill and prep surfaces, angled slightly forward to eliminate shadows.
Halogen and incandescent fixtures generate warmth that compounds grill heat; LED task lights produce minimal heat while delivering bright, focused illumination.
Weather resistance matters for task fixtures. Stainless steel, powder-coated aluminum, and marine-grade plastics resist corrosion; avoid bare copper or uncoated steel, which rust quickly in humid climates.
Ambient and Accent Lighting for Dining and Seating
Ambient lighting sets the mood for entertaining. Mount fixtures 8-10 feet above seating areas to spread light evenly without harsh shadows on faces.
Accent lighting highlights architectural features, plants, or water features. Uplighting a tree creates depth; spotlighting a stone wall or water feature adds sophistication.
Layer these lighting types: ambient for general visibility, task for cooking, accent for atmosphere. Avoid over-lighting, which flattens the space and wastes energy. Aim for 3-4 fixture types, strategically placed, rather than fixtures everywhere.
Outdoor Kitchen Outlet Placement and Positioning
Outlet placement determines convenience and safety. Most codes require outlets every 6 feet along countertops, with at least one within 2 feet of appliances. Plan for 8-12 outlets depending on size and equipment count, positioned 12-18 inches above the counter surface, high enough to avoid water pooling but accessible for small appliances.
Distance requirements from water sources
Outlets must be at least 6 feet away from sinks, ice makers, and water features. This distance prevents accidental submersion and reduces shock hazard. If your layout requires an outlet closer, install a GFCI breaker or GFCI outlet at that location.
Slope countertops away from outlets, even 1/8 inch per foot, to prevent water pooling. Use spring-loaded weatherproof covers that close automatically when outlets aren’t in use, blocking rain and debris while remaining accessible.
Receptacle types and weatherproof covers
Install only GFCI-protected, weatherproof outlets outdoors. Receptacles rated for wet locations (WR) have sealed covers and drain holes. Vertical orientation (ground pin at bottom) sheds water better than horizontal.
For exterior walls, consider in-use covers that let cords stay plugged in while protecting the connection from rain. Standard covers require unplugging before closing, which is less convenient but still protective. Either way, verify covers fit securely without gaps where water can enter.
Outdoor Kitchen Lighting Ideas and Fixture Selection
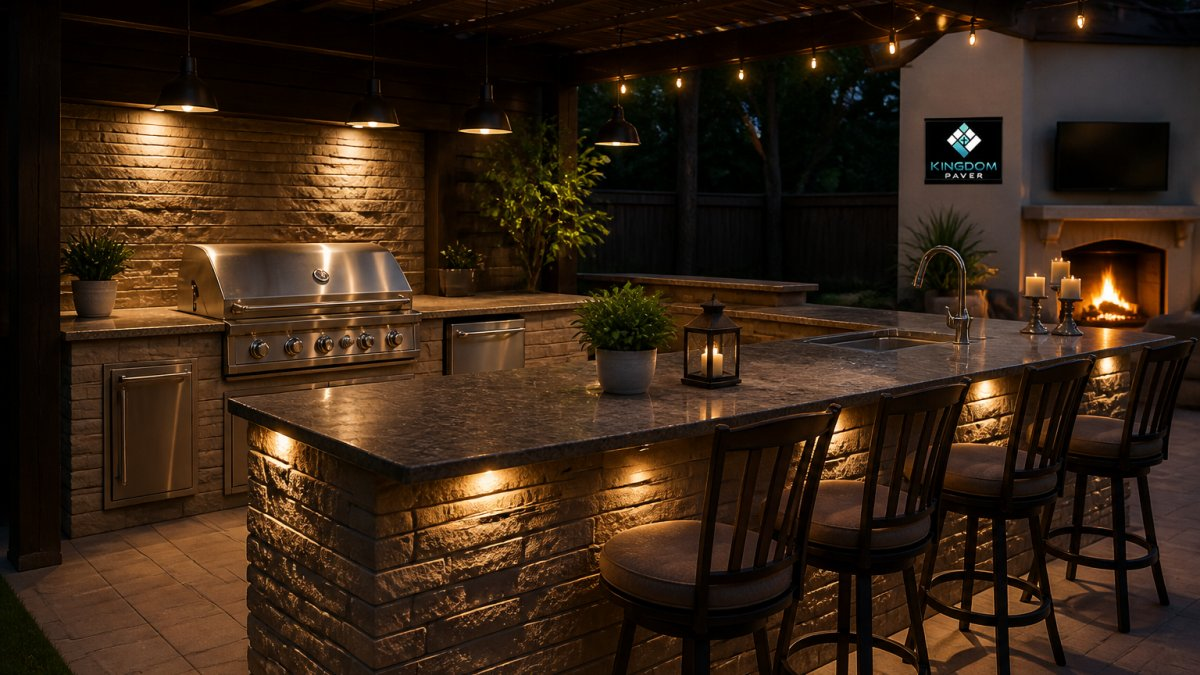
Fixture selection defines your space’s aesthetic and functionality. LED strips under cabinets provide subtle task lighting, pendants above a bar create focal points, lanterns add warmth, and overhead fixtures on soffits or pergolas distribute ambient light evenly.
Professional outdoor kitchen at dusk with warm LED strip lighting glowing beneath stone countertops, overhead pendant lights illuminating a bar seating area, and ambient lanterns creating pools of warm light around a dining table on the patio
LED strips and under-cabinet lighting
LED strips are the workhorse of modern outdoor lighting. Mount them under cabinets or along pergola undersides for indirect ambient light. They’re affordable, energy-efficient, and easy to install, most running on 12-volt low-voltage systems that eliminate high-voltage runs.
Under-cabinet strips illuminate work surfaces without glare. Position them along the front edge of cabinets, angled slightly downward, creating a wash of light on the counter while remaining hidden from view. Waterproof silicone covers protect against moisture and UV damage.
Lanterns, pendants, and overhead fixtures
Lanterns bring character to outdoor spaces. Hanging lanterns from pergola beams create focal points and define seating areas; table-top lanterns add warmth to dining surfaces.
Pendant lights work well above bar seating or islands, mounted 30-36 inches above the counter surface.
Overhead fixtures mounted to soffits or pergolas distribute ambient light across the space. Recessed downlights are subtle and modern, track lighting offers flexibility as your layout changes, and flush-mount fixtures work in tight spaces.
Weatherproofing and corrosion resistance
Outdoor fixtures face constant moisture, temperature swings, and UV exposure. Stainless steel hardware resists rust. Powder-coated aluminum frames resist corrosion better than bare metal. Tempered glass and polycarbonate panels withstand weather without degrading. Silicone gaskets and sealed connections prevent water intrusion.
Check the IP rating on every fixture: IP65 is the minimum for outdoor kitchens, IP67 adds dust protection, and IP68 is fully submersible, overkill except near water features. Verify all connections use marine-grade fasteners and stainless steel hardware.
Safety Lighting: Pathways, Stairs, and Perimeter
Safety lighting prevents trips, falls, and accidents. Pathways need 5-10 foot-candles; low-level path lights 6-12 inches above ground, spaced 4-6 feet apart, create subtle guidance without harsh shadows.
Perimeter lighting defines the space boundary and adds security.
LED path lights consume minimal power, most running on 12-volt low-voltage systems. They’re affordable, easy to install, and last years on a single charge if solar-powered.
Wiring, Controls, and Smart Integration
Wiring complexity depends on fixture count and control preferences. Dedicated appliance circuits require 10-gauge wire (30 amps) or 8-gauge (40+ amps); lighting circuits typically use 14-gauge for 15 amps. Outdoor wiring must be rated for wet locations: use UF (Underground Feeder) cable for buried runs or USE (Underground Service Entrance) for direct burial. Avoid standard NM (Romex) cable, which degrades quickly outdoors.
Low-voltage systems and voltage drop planning
Low-voltage systems (12V or 24V) simplify installation and reduce shock hazard. LED strips, path lights, and some fixtures run on low voltage, requiring a transformer to step down from 120V or 240V.
Voltage drop occurs when current travels long distances through wire; a 12-volt system supplying fixtures 100 feet away can lose 2-3 volts, reducing brightness. Use larger gauge wire for long runs: 14-gauge under 50 feet, 12-gauge for 50-100 feet, 10-gauge over 100 feet.
Dimmers, timers, and smart controls
Dimmers let you adjust ambient lighting for different moods and times of day. Install outdoor-rated dimmer switches in a weatherproof enclosure, and verify LED compatibility since some fixtures flicker on incompatible dimmers.
Smart controls add convenience and efficiency. WiFi-enabled switches let you control lights from your phone, geofencing turns lights on as you approach home, and voice control through Alexa or Google Home adjusts lighting hands-free.
Outdoor kitchen lighting and electrical planning requires careful coordination between aesthetics, function, and safety.
Frequently Asked Questions
What lighting is best for an outdoor kitchen?
The best outdoor kitchen lighting combines three layers: task lighting over the grill and prep surfaces (overhead or under-cabinet LED strips), ambient lighting for dining and seating areas (lanterns or pendant fixtures), and accent lighting for visual appeal (uplighting or hidden LED strips). LED fixtures are ideal because they’re energy-efficient, produce minimal heat, and last longer in outdoor conditions. Choose fixtures rated IP65 or higher for water resistance, and select warm white (2700K-3000K) for dining areas and cooler white (4000K-5000K) for task areas.
Do outdoor kitchen outlets need GFCI protection?
Yes. The National Electrical Code (NEC) requires all outdoor receptacles to be GFCI-protected. This includes outlets within 6 feet of a sink, pool, or water source, and all outlets in wet or damp locations. GFCI outlets instantly shut off power if they detect a ground fault, preventing electrical shock. Install GFCI receptacles directly or protect standard outlets with a GFCI breaker in your electrical panel. Test GFCI outlets monthly by pressing the test button to ensure they function properly.
How many circuits does an outdoor kitchen need?
Most outdoor kitchens require at least 2-3 dedicated 20-amp circuits, depending on your appliances and lighting. A 240-volt circuit is essential for high-draw appliances like built-in grills or refrigerators. Calculate total wattage: add the amperage of every appliance (grill, lights, refrigerator, outlets) and divide by 120 volts to determine circuit needs. Hire a licensed electrician to perform load calculations and ensure your main electrical panel has capacity. Oversizing slightly (adding one extra circuit) provides flexibility for future upgrades.
Where should outlets be placed in an outdoor kitchen?
Place outlets at least 6 feet from water sources like sinks and grills, and position them 12-18 inches above the work surface for convenience and safety. Install at least 2-3 outlets in the prep area, one near the grill, and one at the bar or seating area. All outlets must be GFCI-protected and mounted in weatherproof boxes with sealed covers. Avoid placing outlets where they’ll be exposed to standing water, and ensure they’re accessible without running cords across walkways.
What is the ideal lighting layout for an outdoor kitchen?
Divide your outdoor kitchen into functional zones: the cooking area (grill and prep surfaces), dining area, seating area, and pathways. Install bright task lighting (300-500 lumens per fixture) over cooking surfaces, medium ambient lighting (150-300 lumens) over dining tables, and softer accent lighting (50-150 lumens) in seating zones. Use 4000K-5000K color temperature for task areas and 2700K-3000K for ambient and accent zones. Space fixtures 8-10 feet apart for even coverage, and plan for dimmers to adjust brightness for different times of day.
Can outdoor kitchen lighting be connected to a smart home system?
Yes. Smart outdoor lighting systems allow you to control brightness, color temperature, and scheduling via smartphone apps or voice commands. Use low-voltage LED systems with smart controllers rated for outdoor use (IP65 or higher). Ensure your system operates on weatherproof wiring and is installed by a licensed electrician to meet code. Smart dimmers and timers let you automate lighting at sunset or create scenes for entertaining. Check that all components are rated for wet locations and properly grounded.
What electrical load calculations do I need for outdoor kitchen lighting?
Calculate total wattage by adding the power draw of all fixtures and appliances. Standard LED lighting draws 8-15 watts per fixture; high-output task lights draw 40-60 watts. A typical outdoor kitchen uses 500-1500 watts for lighting alone. Add appliance wattage (grills: 3000-5000W, refrigerators: 600-800W, water features: 500-1000W). Divide total wattage by 120 volts to get amperage. A 20-amp circuit supports 2400 watts; a 30-amp supports 3600 watts. Always consult a licensed electrician to verify your home’s panel capacity and plan adequate circuits.