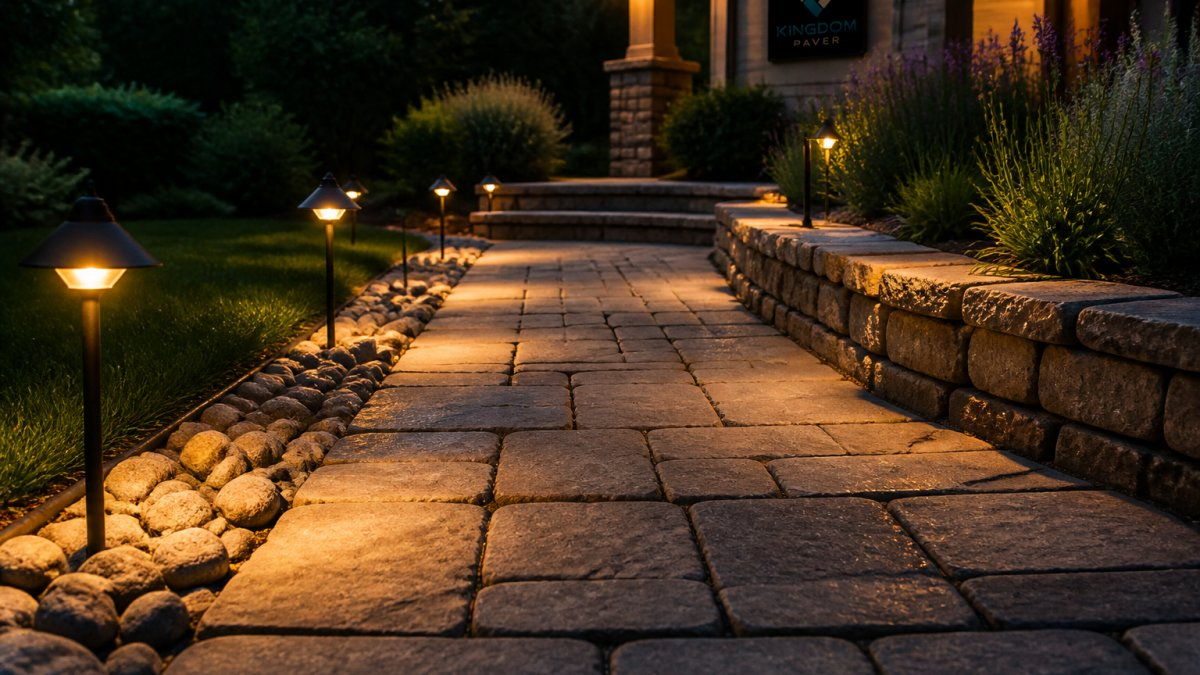
Pathway lighting on uneven pavers works best when you light the change, not the flat: aim fixtures across the walkway at a shallow angle so lifted edges and settled joints both register. Layer soft ambient light with focused accent light on steps, transitions, and settled pavers, and keep fixtures out of the walking line.
Aim fixtures across the walkway at a shallow angle instead of down the centerline.
Place fixtures where the ground changes height, angle, or material, not on flat runs.
Light every other step tread on alternating sides to avoid a runway effect.
Use solar for accent and ambience, and keep the safety layer on wired low-voltage.
Run cable in joint sand or a shallow trench beside the walkway, not under pavers.
Why Uneven Pavers Need a Different Lighting Approach
Pathway lighting ideas for uneven pavers start with one hard truth: pathway lighting on a paver walkway that shifts, tilts, or settles is a different problem than on a flat one.
Uneven pavers are walkway surfaces where individual stones sit at different heights or angles, creating elevation changes that standard lighting layouts do not account for. Standard path lights cast a cone straight down.
That distinction matters because lighting does two jobs on a walkway. It shows people where to walk, and it shows them where the ground changes. On a flat surface those are the same job.
Where Elevation Changes Create Trip Hazards
The risky spots are predictable. A paver that has heaved at a tree root, a joint that has settled after heavy rain, a step-down at the end of a walkway: these are where feet catch. A single light placed at the top of a step throws the tread below it into shadow, which is worse than no light at all.
How Light Reveals Surface Texture
Grazing light, angled low across the surface, exaggerates texture. That is usually a problem for photography and a gift for safety. On a walkway with mixed surface texture, a low grazing beam catches every lifted edge and sunken joint, so the eye reads the unevenness before the foot finds it. Flat, overhead light hides exactly what you need to see.
Paver Walkway Lighting Ideas That Work With the Grade
The best paver walkway lighting ideas treat the grade as a feature to work with, not a flaw to hide. For the full walkway design and build context before choosing fixtures, see this complete guide to custom walkway design and build. Two techniques do most of the heavy lifting, and both work on walkways that were never perfectly flat to begin with.
Washing Light Across the Surface Instead of Down the Path
Instead of pointing fixtures down the centerline, aim them across the walkway at a shallow angle. This wash technique lights the width of the path and skims the surface, so high and low pavers both register. It also spreads illumination more evenly, which means fewer fixtures and less glare. For a curved walkway, angle each fixture to follow the arc rather than the straight line.
Layering Ambient and Accent Light
One layer is never enough on an uneven surface. Combine soft ambient lighting for general visibility with focused accent lighting on the spots that need attention: steps, transitions, and any paver that has visibly settled. Readers exploring layering can also browse alternatives to traditional backyard lighting. The ambient layer keeps the path walkable; the accent layer keeps it safe.
Low-Voltage Pathway Lights: The Backbone of a Paver Layout
Low-voltage pathway lights are the practical default for paver walkways, and for good reason. Low-voltage lighting is an outdoor system that runs through a step-down transformer, rather than the standard household voltage used by line-voltage fixtures. That lower voltage makes installation simpler and safer around hardscape.
The trade-offs are real. Low-voltage systems lose brightness over long cable runs, so transformer placement and cable sizing matter. Cheap fixtures fail at the connection point first, not the bulb.
Paver Path Lighting Placement Around Steps, Joints, and Transitions
Paver path lighting placement decides whether a layout works. The rule we follow: light the change, not the flat. Put a fixture where the ground does something, and leave the even stretches to a wider wash.
Diagram showing optimal pathway lighting placement for paver steps, stone joints, and walkway transitions.
A Practical Placement Map for Uneven Pavers
Use this map as a starting point, then adjust for your specific walkway. The goal is to place fixtures where the ground changes height, angle, or material, and to keep them out of the walking line.
Raised or heaved pavers: Place a ground-level or recessed fixture just off the high edge, aimed across the lifted paver and the joint beside it. This lights both the high point and the low joint, so the eye reads the change before the foot finds it. Avoid placing the fixture directly on the raised paver, where it can be kicked or cast a shadow on the lower side.
Settled joints and low spots: Set a recessed light just off the seam, angled across the drop. The beam should graze both sides of the joint so the depth is visible. If the low spot is wide, use two fixtures on opposite sides rather than one bright fixture in the middle.
Steps and step-downs: Place fixtures to the side of the tread, never directly at the riser. Aim across the tread so the light washes the walking surface and the riser stays softly lit. A single light at the top of a step throws the tread below into shadow, which is worse than no light. For a full flight, light every other tread on alternating sides to avoid a runway effect.
Spacing and Beam Direction on Uneven Ground
Even spacing is the wrong goal on uneven ground. Space fixtures by where the grade changes, then fill the flat runs at wider intervals. A beam spread wide enough to overlap the next fixture’s pool prevents dark gaps. Aim beams across the path, not along it, and check glare from the height of a standing person, not from the ground.
Location
Fixture Choice
Aim
Why It Works
Settled joint
Ground-level or recessed
Across the seam
Lights both sides of the drop
Step tread
Side-mounted path light
Across the tread
Avoids shadow on the riser
Material transition
Recessed light
Flat across change
Marks the edge, no trip post
Flat run
Path light, wide beam
Across the path
Overlapping pools, fewer fixtures
Curve
Angled path light
Following the arc
Even wash around the bend
Raised paver
Ground-level or recessed
Across the high edge
Reveals the lift and the joint beside it
Pro Tip Walk the path at night with a handheld light before you commit to a layout. Stand where a visitor would stand and look for dark holes at every height change. Mark those spots with landscape flags, then place fixtures to light the change, not the flat.
Keep fixtures out of the walking line so nobody kicks them. On narrow walkways, recessed fixtures flush with the paver surface are the safest choice because they eliminate trip posts entirely.
Solar Lights for Walkways: Where They Fit and Where They Don’t
Solar lights for walkways earn a place on sunny, open runs where running cable is impractical. They cost nothing to operate and install in minutes. Where they fall short is consistency: output drops on cloudy stretches and in shaded corridors, and cheap units dim noticeably as the battery ages. If you are weighing solar options, this guide covers installing solar landscape lighting on a budget.
Matching Light to Paver Color and Finish
Paver color and finish change the lighting plan more than most people expect. Dark pavers absorb light, pale pavers bounce it, wet surfaces shift tone, and textured surfaces scatter it. A layout that looks right on a dry, medium-tone paver can feel harsh on wet flagstone or flat on dark charcoal. The fix is to match beam angle, color temperature, and fixture spacing to the surface you actually have.
Dark Pavers
Dark pavers (charcoal, deep brown, black) absorb a large share of the light that hits them. They need more fixtures or a warmer, higher-output beam to read clearly. A narrow beam aimed across the surface works better than a wide wash because it concentrates light where it matters. Avoid cool-white LEDs on dark pavers; the blue cast makes the surface look flat and cold.
Pale and Reflective Pavers
Pale concrete and light limestone bounce light back and can glare if you aim a bright fixture straight at them. Use a wider beam at lower output, and aim it across the surface rather than down at it. Shield the fixture so the light source is not visible from the walking line. On highly reflective pavers, a glare bomb is more likely than a dark hole, so check the view from a standing person’s height before you finalize placement.
Wet and Sealed Pavers
Wet flagstone and sealed pavers shift tone entirely, which is why a layout that looks right in dry weather can feel harsh after rain. Sealed surfaces can become mirror-like, throwing glare back at the walker. Use fixtures with shields or louvers to control the beam, and aim them at a shallower angle so the reflection goes away from the eye.
Textured and Tumbled Pavers
Textured and tumbled surfaces scatter light in many directions, which is good for safety because it reveals the surface profile, but it can also reduce the effective reach of each fixture. Use a slightly wider beam and overlap the pools more than you would on a smooth surface. Grazing light at a low angle exaggerates texture, which helps the eye read unevenness before the foot finds it.
Mixed-Color Walkways
On mixed-color walkways, test one fixture at night before committing to a full layout. It is the cheapest mistake you can make. Place a single fixture at the manufacturer’s recommended spacing, view it from several angles, and adjust the aim and color temperature before you buy the rest. Warm light, in the range most low-voltage LED fixtures offer, flatters both dark and pale surfaces without the blue cast that makes concrete look cold.
Key Takeaway Match the beam to the finish: narrow and warm for dark pavers, wide and shielded for pale or reflective pavers, shallow-angled and shielded for wet or sealed pavers, and wider with more overlap for textured pavers. Test one fixture at night before you commit to the full layout.
Installing Lighting Without Destabilizing the Pavers
A few rules keep the base intact. Run cable in the joint sand or a shallow trench beside the walkway, not under the pavers.
Planning Your Paver Walkway Lighting With Kingdom Paver
Lighting an uneven walkway well comes down to three decisions: light the changes, layer the light, and protect the base during install. Get those right and the path reads clearly at night without a single glare bomb.
If the walkway itself is the problem, lighting will only expose it. You can also browse Kingdom Paver’s services and get in touch.
Frequently Asked Questions
How do you light an uneven paver walkway without creating glare?
Aim fixtures across the surface rather than straight up the path, and keep the beam below eye level. Shielded or louvered caps on low-voltage pathway lights direct light onto the pavers instead of into a walker’s eyes. On uneven ground, a wider beam spread (around 60 to 90 degrees) softens hotspots so raised edges and dips read clearly. Warm light in the 2700K to 3000K range also reduces the harsh contrast that causes glare on pale concrete or wet flagstone.
Where should paver path lighting placement go around steps and joints?
Place lights at the top and bottom of every step so each riser is visible, and offset fixtures a few inches from joints rather than directly on them. Keep lights roughly 6 to 8 feet apart on straight runs and closer together on curves or slopes. Position them on the outer edge of the path so the beam crosses the walking surface. This layout improves visibility on uneven pavers and cuts trip hazards without cluttering the walkway.
Are solar lights for walkways bright enough for uneven pavers?
Solar path lights work well for ambient guidance on low-traffic walkways, but output drops on cloudy days and in shaded yards. For uneven pavers where trip hazards matter, use solar fixtures with a stated lumen output and a shielded head, and place them where they get full sun. For consistent brightness and beam control on steps or transitions, low-voltage pathway lights wired to a transformer are the more reliable choice.
Can lights be installed between or within pavers without loosening them?
Yes, paver-integrated and recessed lights can be set into the walkway, but the base and bedding sand must be recompacted around the fixture so the surrounding pavers stay put. Drill or core only where the fixture housing fits, keep wiring in a protected sleeve, and avoid cutting load-bearing edges near steps. A professional installer can integrate lights during a new walkway build or retrofit them carefully into existing pavers.
A walkway that shifts underfoot will keep shifting no matter how well you light it. If your pavers are settling, cracking, or pooling water, the fix starts with the base, not the fixtures. Kingdom Paver brings ten years of hardscape experience to walkway repair and new builds, with custom solutions tailored to your yard and honest pricing up front. Get started with Kingdom Paver and light a walkway that stays level for years.