
Last Updated: November 2, 2026
Quick Summary
To repair driveway drainage issues, first diagnose whether the surface no longer slopes toward an exit or the exit itself is blocked. The most common DIY fix is regrading the surface so it sheds water again, while a channel drain set across the low point handles water sheeting across a wide, flat apron.
- Standing water lingering more than a day after rain usually means the grade has flattened or gone negative.
- Regrading builds a correct 2% slope by adding or removing base material, compacted in thin lifts.
- A channel drain typically needs a 3- to 5-inch internal width for a two-car apron.
- Drain pipe needs roughly 1/8 inch to 1/4 inch of fall per foot and must never bell upward.
- Call 811 to have underground utilities marked before any trench deeper than a few inches.
Table of Contents
- Diagnosing Your Driveway Drainage Problem
- How to Fix Water Pooling in Driveway DIY
- Sloping Driveway Drainage Solutions
- Driveway Channel Drain Installation
- Gravel Driveway Drainage Solutions
- When to Call a Professional for Driveway Drainage Repair
- Get a Drainage Assessment Before Your Next Paver Project
- Frequently Asked Questions
Diagnosing Your Driveway Drainage Problem
Water pooling on a driveway almost always traces back to one of two failures: the surface no longer slopes toward an exit, or the exit itself is blocked. Water finds every weak spot in a driveway, and the fix starts with knowing which of those two problems you actually have. Once you’ve identified pooling water, see these proven methods to fix standing water on driveways. Learning how to repair driveway drainage issues begins with a diagnosis, not a shovel.
Here’s the order to follow when assessing a driveway.
Check the Slope and Grade
Grab a level and a tape measure. A driveway generally needs a modest slope away from the garage, which is worth checking with a level. Standing water that lingers more than a day after rain usually means the grade has flattened out or gone negative. Negative grade means the surface tilts back toward the house, and that’s the scenario that damages foundations. Check several spots along the length, not just one.
Look for Cracks and Settlement
Walk the whole surface and note where it dips. A sunken driveway, cracks that widen after rain, and soil pulling away from the edges all point to settlement underneath. Water gets into those cracks, softens the base, and the cycle gets worse each season. Mark problem zones with chalk so you can see the pattern. If the low spots sit in the same place year after year, settlement is your culprit, not surface wear.
How to Fix Water Pooling in Driveway DIY
The most common DIY fix for water pooling in a driveway is regrading the surface so it sheds water again. It’s also the fix most homeowners get wrong, because they add material without removing the cause. A puddle is a symptom. The flat spot underneath it is the disease.
Regrading and Reshaping the Surface
Regrading means reshaping the driveway so water flows toward an outlet instead of sitting in a bowl. For the full process, follow this step-by-step guide to grading a driveway for proper water flow. Here’s how we’d approach it:
- Map every low spot with a straight edge and chalk
- Remove the top layer of pavers or asphalt in the affected zone
- Add or remove base material to build the correct 2% slope
- Compact the base in thin lifts, not one thick dump
- Reinstall the surface and check the flow with a hose test
Watch out: pouring self-leveling compound into a puddle fills the dip without fixing the grade, and the water can return.
Sloping Driveway Drainage Solutions
A steep driveway has the opposite problem from a flat one: water moves fast and erodes the edges on the way down. The fix is to slow it and guide it, not to fight the slope. Sloping driveway drainage solutions usually combine a shallow swale along one edge with a hard outlet at the bottom. A dry creek bed of river rock works well at the base, and it redirects runoff without a trench.
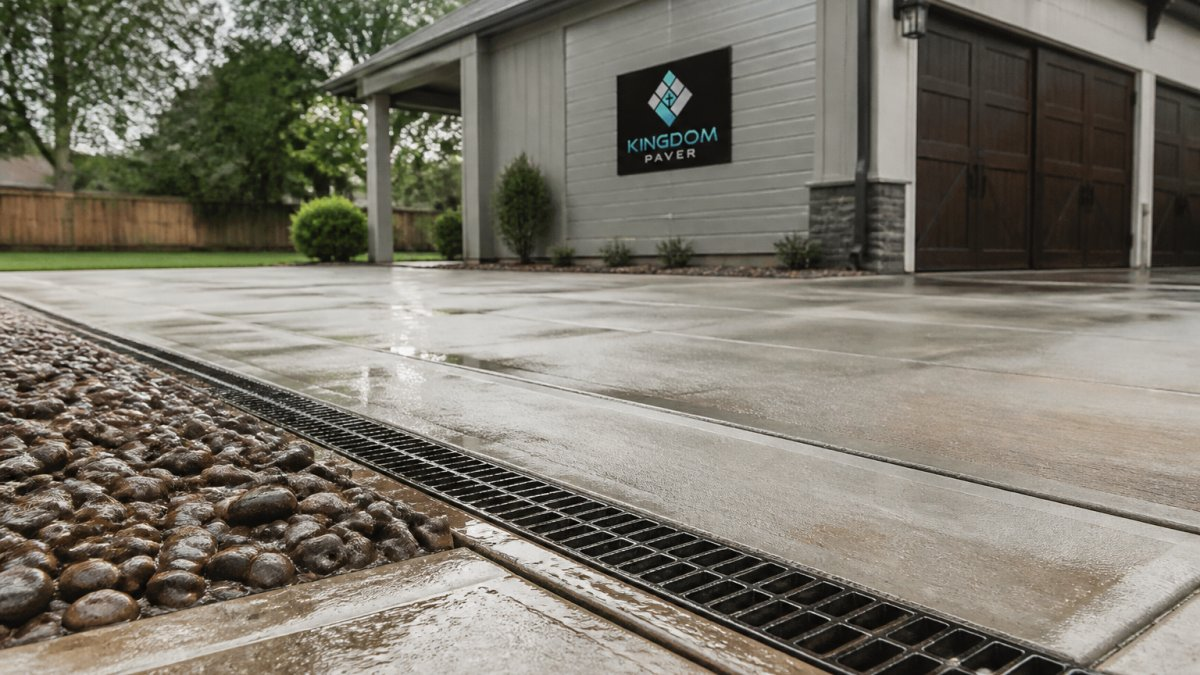
Driveway Channel Drain Installation
A driveway channel drain is a linear trench drain set across the low point of the driveway, capped with a grate, that collects runoff and carries it to a discharge point. After installation, learn how to clean and maintain trench drains.

Size the Drain Before You Buy It
Channel drains are sold by internal width and grate load class, and the two numbers that matter are the width of the channel and the load rating of the grate. A common residential pattern is a 3- to 5-inch internal width for a typical two-car apron, with a grate rated for pedestrian and light-vehicle loads. If the driveway also serves an RV, trailer, or heavy truck, step up to a grate rated for vehicular traffic; a light-duty plastic grate will crack under a loaded axle.
Plan the Outlet and Pipe Fall First
A channel drain is only as good as its outlet. Before excavation, confirm where the water will go: a daylight outlet at a slope, a dry well, a pop-up emitter, or a connection to a storm system where local rules allow it. The drain pipe needs continuous fall toward that outlet, most practitioners aim for roughly 1/8 inch to 1/4 inch of drop per foot of pipe, and the pipe must never bell upward between the drain and the discharge.
Step-by-Step Install
- Mark the trench line across the low spot, extending past both edges of the water path.
- Cut and excavate to the drain body’s depth plus the base and the pipe fall.
- Set a compacted base, then set the drain with a slight fall toward the outlet.
- Connect the drain pipe, glue or clamp the joints, and route it to the planned discharge.
- Backfill and compact in thin lifts, then pour or patch concrete around the body so the grate sits flush with the surface.
- Test with a hose at full flow before you call it done, and confirm water exits at the outlet, not at a joint.
Watch out: a grate set above the surface becomes a trip edge, and one set low becomes a sediment trap, so check the flush fit with a straightedge before the patch cures.
Material-Specific Notes
In asphalt, cut a clean, straight saw line and seal the joint between the drain body and the asphalt after patching; a ragged cut lets water migrate under the mat. In concrete, isolate the drain body from the slab with a joint so slab movement does not crack the channel. In pavers, set the drain body on a compacted base and cut the border pavers tight to the grate frame, then re-sand the joints.
Here are the key sizing, outlet and installation facts to check before cutting concrete for a channel drain.
| Item | Value | Note |
|---|---|---|
| Typical internal width | 3 to 5 inches | For a typical two-car apron |
| Grate rating | Pedestrian and light-vehicle loads | Step up for RV, trailer or heavy truck |
| Pipe fall | Roughly 1/8 inch to 1/4 inch per foot | Must never bell upward |
| Channel length | Match width of the water path | Not the width of the driveway |
| Outlet options | Daylight outlet, dry well, pop-up emitter, storm connection | Storm connection where local rules allow |
| Grate fit | Flush with the surface | High is a trip edge, low is a sediment trap |
| Install time | A weekend project | For a handy homeowner |
Gravel Driveway Drainage Solutions
Gravel driveways drain well until the fines pack down and the surface crowns or dips. The fix is a mix of reshaping and edge control. Crown the center slightly so water sheds to both sides, and line the edges with a shallow ditch. Geotextile fabric under fresh gravel stops mud from pumping up and clogging the stone. For paver areas, choose the best sand for paver joints to improve water runoff.
When to Call a Professional for Driveway Drainage Repair
Most surface fixes, clearing a clogged grate, re-sanding joints, adding a swale, resetting a downspout, are safe DIY work. The line to call a pro is drawn by what is under the surface, not by how big the puddle looks. Use these thresholds to decide.
Signs the Problem Is Structural, Not Surface
Call a professional when you see any of the following:
- A low spot that returns in the same place after every regrade, which points to a settled base rather than surface wear.
- Cracks that widen after rain, or a slab or paver field that has dropped relative to the garage apron or the street.
- Soil pulling away from the driveway edges, or a visible void under the edge of the slab.
- Water entering the garage, or a damp foundation wall on the driveway side, which means the grade is running toward the house.
- A driveway that has settled more than roughly an inch or two across a short run, which usually needs base reconstruction, not a patch.
Those jobs need excavation, compaction control in thin lifts, and a plan for where the water discharges. A patch or a self-leveling pour over a settled base fails within a season.
Utility Conflicts and Excavation Limits
Before any trench deeper than a few inches, call 811 and have underground utilities marked. A channel drain, catch basin, or French drain that crosses a gas, water, sewer, or electrical line is a contractor job, and cutting a utility is far more expensive than the drain. If the only viable outlet requires crossing a sidewalk, curb, or public right-of-way, stop and get guidance, work in the right-of-way usually needs a permit and sometimes a licensed contractor.
Discharge, Boundaries, and Stormwater Rules
Where the water goes matters as much as how you collect it. A common pattern is a homeowner who fixes the puddle but sends the runoff onto a neighbor’s yard or across a property line, which can create a legal dispute and a new erosion problem. Route discharge to a lawful outlet on your own property, a dry well, a vegetated swale, a daylight slope, or a storm connection where local rules allow it.
What a Pro Brings
A drainage contractor brings a laser level or transit to measure actual slope, compaction equipment to rebuild a base that will not resettle, and experience routing water to an outlet that will not create a new problem. If you would rather have a professional handle it, contact Kingdom Paver for a quote.
Get a Drainage Assessment Before Your Next Paver Project
Every paver project is a chance to fix drainage before it starts. New pavers laid over a bad grade will pool and settle just like the old surface did. Assessing slope and runoff before installation helps the finished driveway shed water instead of collecting it. Kingdom Paver brings ten years of experience and custom building solutions to every job.
Get started with Kingdom Paver and build a driveway that drains right from day one.
Frequently Asked Questions
How do you fix standing water on a driveway?
Start by checking the slope: standing water usually means the surface is flat or sloping toward the house. You can regrade small areas with a rake and compacted soil, or install a channel drain at the low point to collect runoff. For deeper settlement, a contractor may need to lift or replace sections of the driveway. Fixing driveway drainage early prevents cracks and erosion from getting worse.
Can I dig a hole and fill it with gravel for drainage?
A gravel-filled hole, sometimes called a dry well, can work for small puddles if the soil drains well, but it is not a reliable fix for a sloping driveway or heavy runoff. Without a proper outlet or drain pipe, the hole fills up and the water returns. For consistent results, connect the gravel pit to a catch basin or French drain that moves water away from the driveway.
What is the cheapest way to fix a muddy driveway?
The lowest-cost fix is usually regrading the surface so water flows away, plus clearing clogged gutters and downspouts that dump water onto the driveway. Adding a shallow gravel trench along the edge can redirect runoff for a modest cost. If the mud comes from a high water table or poor soil, you may need a French drain, which costs more but solves the problem long term.
Will a channel drain stop water from entering a driveway?
A channel drain placed across the driveway entrance intercepts runoff before it reaches the garage or low spots. It works best when sized correctly and connected to an outlet that carries water away from the property. Without proper slope and discharge planning, the drain can overflow in heavy rain. Pair it with a catch basin for larger volumes and clean the grate regularly to keep it flowing.


